Getting Started

Set Up Warehouse & Shipping for TikTok Shop US

Update on: 18/11/2024

Table of contents

Once you’ve successfully set up a TikTok Shop US account, the next important steps are to set up a warehouse, add a pickup/return address, and choose your shipping options. Our step-by-step guide will walk you through everything!

How to set up a pick-up and return warehouse

TikTok requires a warehouse/pickup address to complete your store setup, so follow the instructions below.

Steps

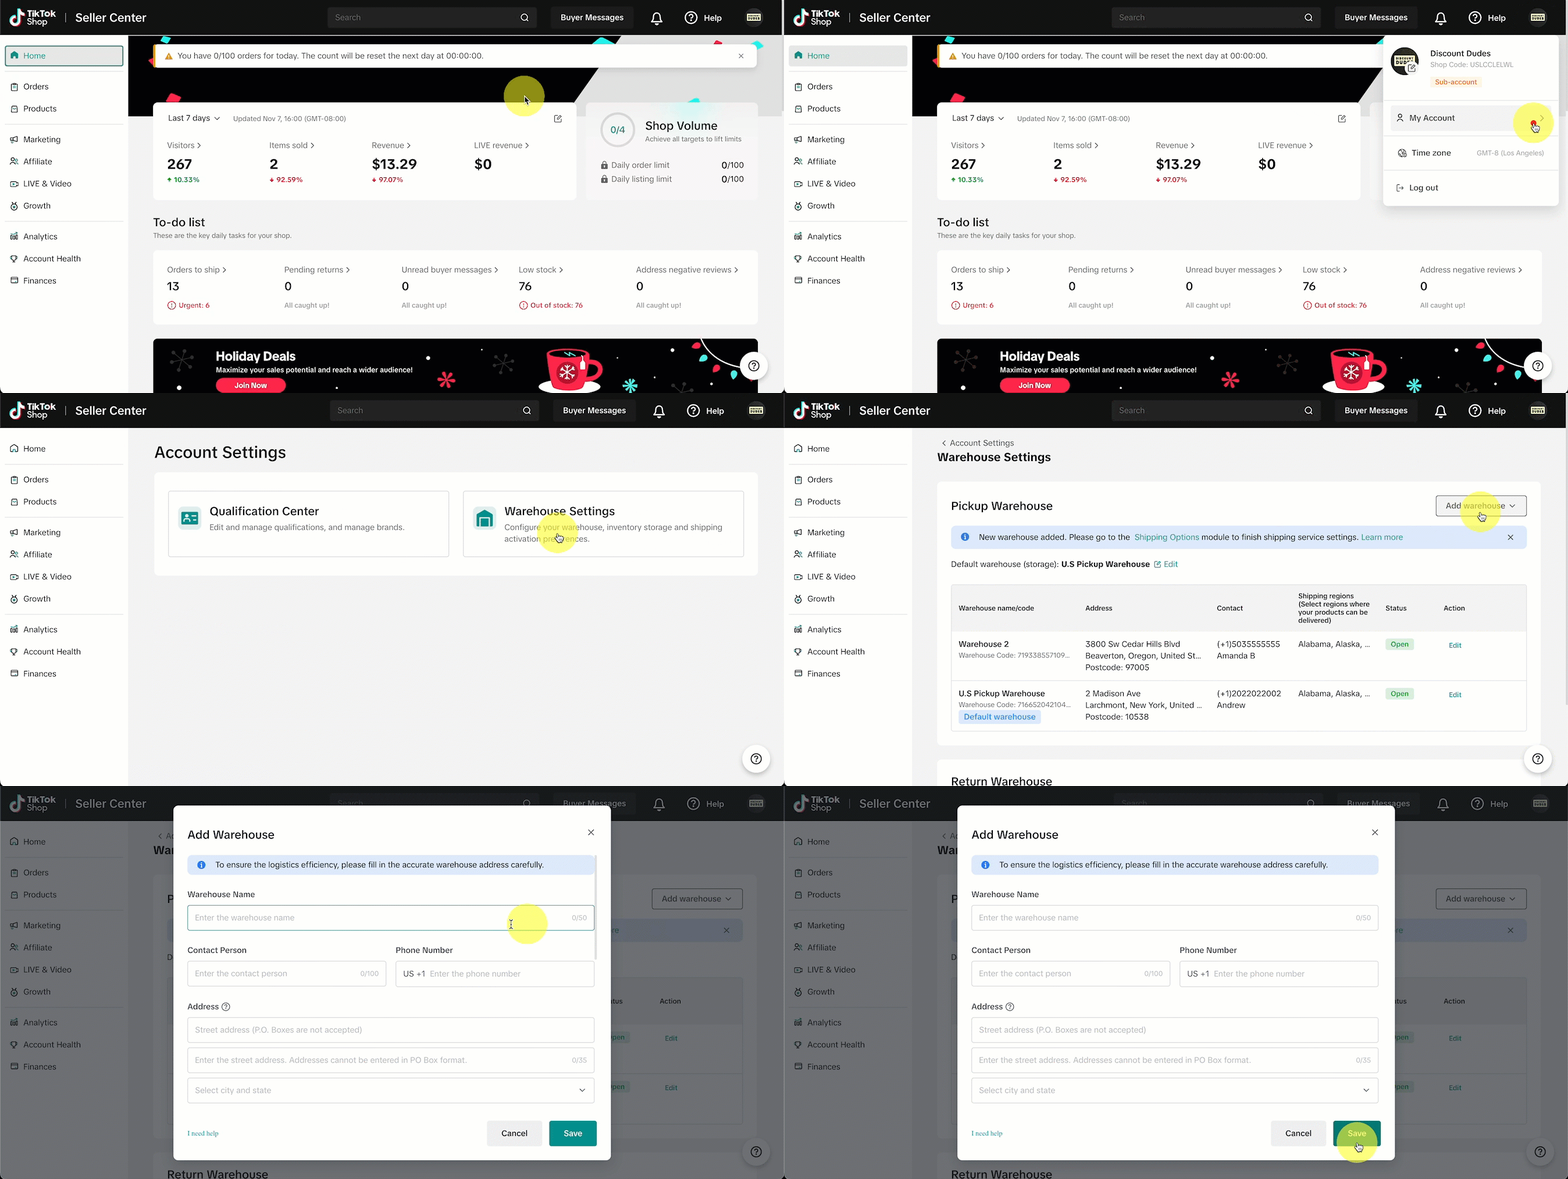
1. Log into your TikTok Shop US account and go to the upper right corner of the home screen.

2. Click My Account and select Account Settings from the dropdown menu.

3. In the account settings, find and click on Warehouse Settings.

* Here you’ll see that addresses are required for both the pickup and return warehouse.

4. Click Add warehouse on the right next to the “Pickup Warehouse” section.

5. Fill in all the required information

6. Click Save for new changes.

7. Scroll down the Warehouse Settings page to the “Return Warehouse” section and click Add warehouse.

8. Check the “Same as the saved warehouse address” option.

9. Select your current warehouse name from the drop-down menu.

10. Click Save.

How to set up shipping for TikTok Shop US

It’s now time to create and fill out a shipping template in your TikTok Shop account. This step is crucial because you won’t be able to add products without a shipping template.

Step 1: Create a shipping template

Choose one of the two setup options: free shipping or quantity-based shipping. Here’s a comparison:

Free shipping Quantity-based shipping
Include the shipping cost in the retail price Suitable if you are selling a single or limited product type (e.g., t-shirts)
Flexibility to offer different types of products Fixed shipping rate for all of your products
“Free shipping” badge on TikTok Reduced shipping rate for additional items
Benefit from TikTok’s Co-Funded Free Shipping program (orders valued USD 30 or more)


Free shipping

Steps

1. Select Orders in the side menu of your TikTok Seller Center.

2. Select Shipping Templates.

3. Click Create on the right side of the page.

4. In the Create template pop-up, click OK.

5. Give the template a name, choose the warehouse you created in the Ship from and select the quantity-based rate model.

6. Select the Standard Shipping checkbox and enter the Flat Rate shipping cost.

7. Click Submit to save the template.

Quantity-based shipping

Steps

1. Navigate to Orders > Fulfillment settings > Shipping and delivery.

2. Click on the Create button located on the right side of the page.

3. In the Create template pop-up, click OK.

4. Give the template a name, choose the warehouse you created in the Ship from and select the quantity-based rate model.

5. Select the Standard Shipping checkbox and click on Use price conditions.

6. Enter shipping prices based on product quantity. Calculate the shipping cost for each quantity range.

7. Add as many ranges as necessary.

8. Create a new delivery region.

9. Repeat the previous process and enter the same quantity-based rates.

10. Click Submit to save the template.

Step 2: Select “Seller shipping” in your settings

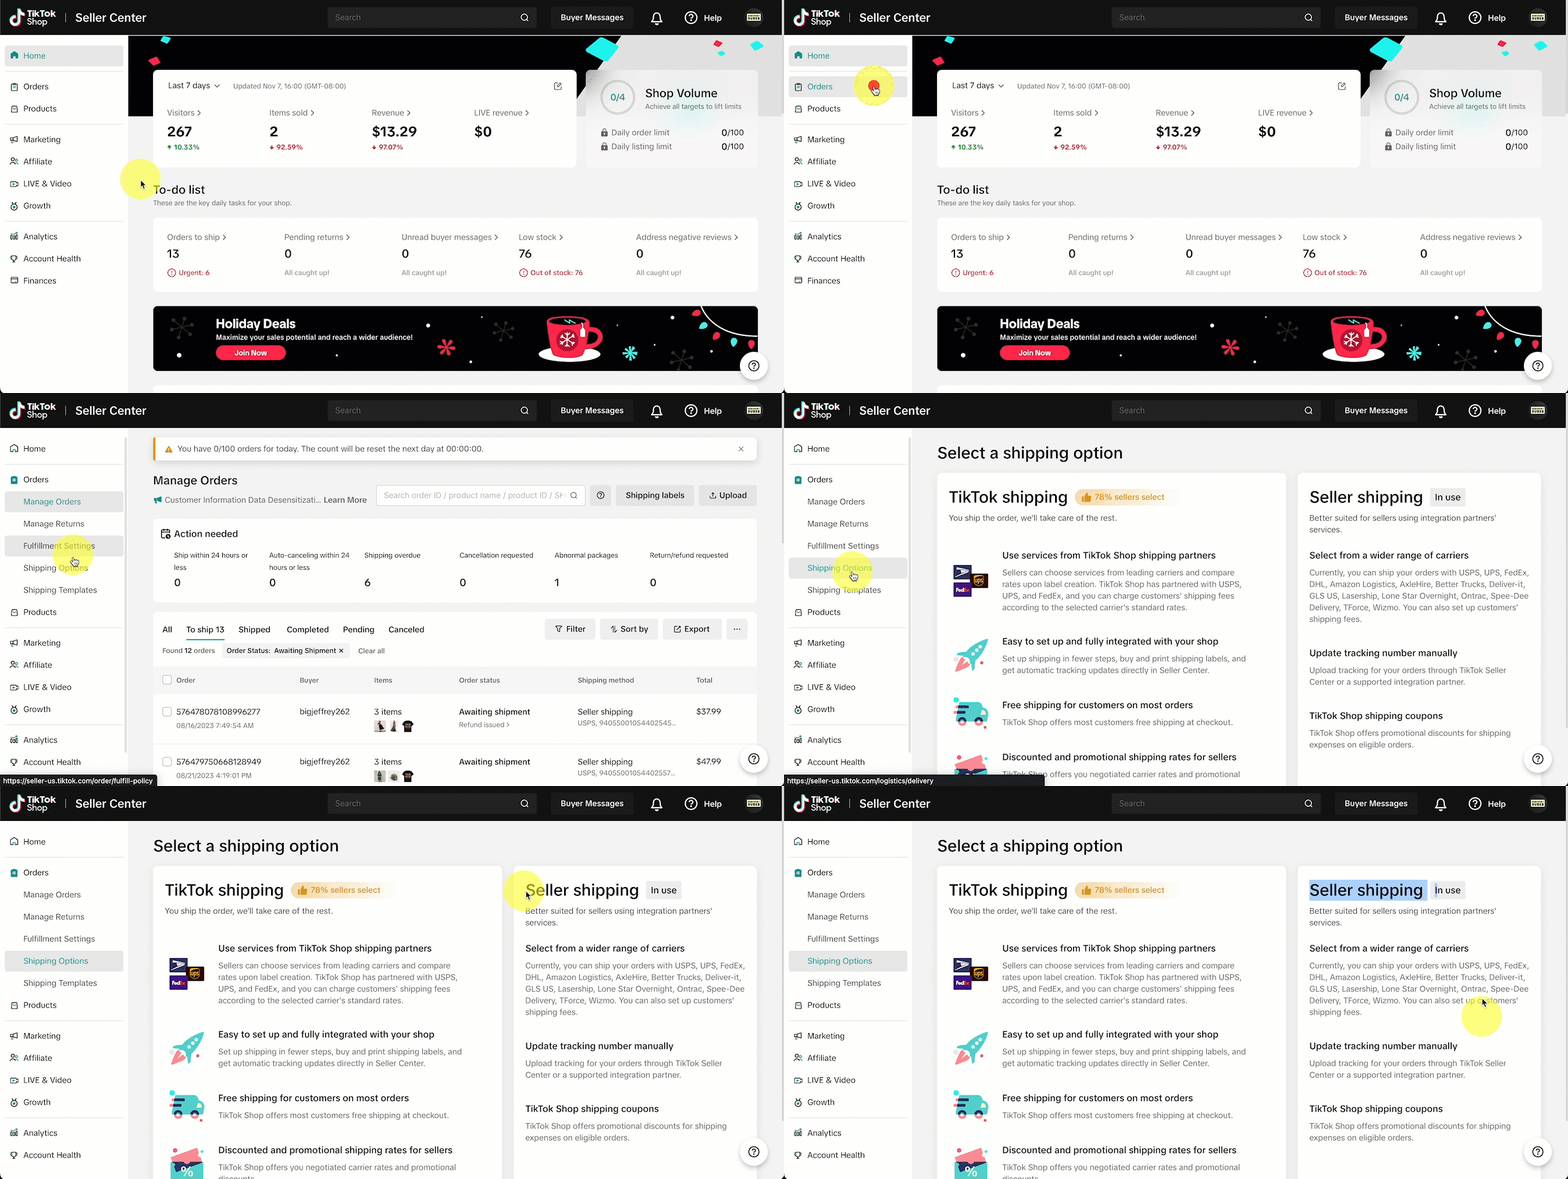
It’s essential to complete this step, as otherwise, your TikTok orders won’t be imported.

Steps

1. From the left menu, select Orders > Fulfillment settings.

2. Click Switch option and select Seller shipping.

3. Click OK to save your changes.That’s it! Your TikTok Shop is all setup and ready to begin selling once you’ve completed these steps. As the next step, list products in your TikTok Shop.

If you have already built your online store, you can sync products from Shopify or import new products directly from Zopi.

Related articles

Link Zopi with your CJ Dropshipping account

When you’re ready to fulfill orders for products sourced from CJ Dropshipping, the first step is to link your CJ Dropshipping account. In this quick guide, we are going to go through the process of connecting a CJDropshipping account to Zopi. How to link your CJ Dropshipping account Method 1: In the Account menu Steps…

Change Zopi language

Zopi app now supports these languages: English, Arabic, French, Portuguese (Brazil), German, Italian, Netherlands, Spanish and Chinese. You can switch between them as needed. How to change language in the Zopi web app Steps: Login to Zopi. On the right side of the Top Bar, choose your preferred language from the drop-down menu. IMPORTANT NOTE: Languages not…

Understanding Orders from Different Channels to Avoid Duplicate Orders

Zopi now integrates with Shopify, WooCommerce, and TikTok Shop US. This integration simplifies the order management process, streamlining your order management process across different sales channels. Here’s how it works: 1. Direct Order Sync from TikTok Shop to Zopi When your TikTok Shop is connected directly to Zopi, any orders placed on TikTok Shop US…

Subscribe
Notify of
guest

0 Comments
Inline Feedbacks
View all comments

Table of contents

Related articles

Understanding Orders from Different Channels to Avoid Duplicate Orders

Zopi now integrates with Shopify, WooCommerce, and TikTok Shop US. This integration simplifies the order management process, streamlining your order management process across different sales channels. Here’s how it works: 1. Direct Order Sync from TikTok Shop to Zopi When your TikTok Shop is connected directly to Zopi, any orders placed on TikTok Shop US…

Set Up Notifications in Zopi

Keeping track of your supplier products and orders is crucial for streamlined operations. With the Zopi Notification feature, you can receive real-time updates about critical information related to products, suppliers, and orders. Let’s delve into what’s new in notifications, starting from March 25, 2024 A new-look User Interface The UI is redesigned to make receiving…

Install & use the Zopi Chrome extension

The Zopi Chrome extension is a free automation tool compatible with the Zopi app. By installing it, you can maximize the benefits of Zopi for your dropshipping business. How to install the Zopi Chrome extension Steps Go to Chrome, and open Chrome Web Store. Search Zopi in the Search Box and click Zopi: AliExpress Product Importer or just…

Share your thought